In our last article, we talked about how you can start selling on amazon. Now, this article is for all those sellers who want to sell on Flipkart. In today’s article, we will shortly talk about why you should choose Flipkart over amazon. To begin let’s look at the statistics for both Flipkart and Amazon.
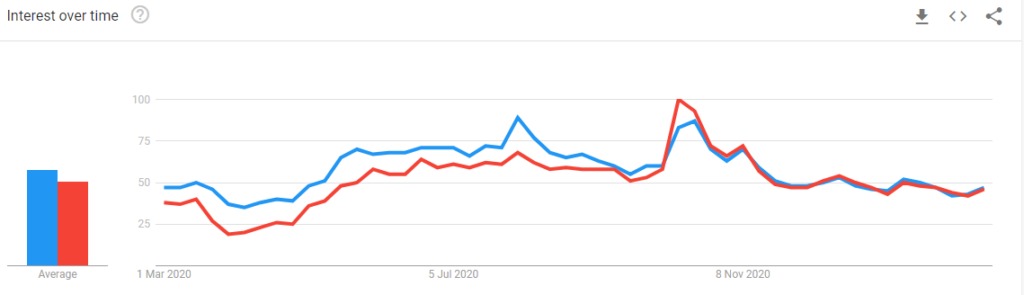
This graph shows the searches for both Flipkart and Amazon over the last year. At the beginning of 2020, you can see that amazon in blue was searched more time than Flipkart. But as 2020 goes on the Flipkart starts to close the gap between the two. There was one time when Flipkart even manages to overtake a big giant amazon. Now there is something which you should think about when deciding the platform on which you want to sell your products. Amazon absolutely crushes Flipkart when it comes to other countries. Below is the chart that compares both Flipkart and amazon globally.
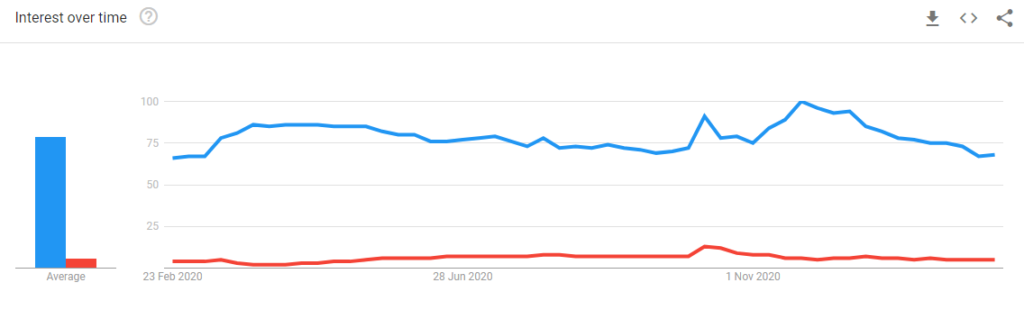
Again, the blue is represented by amazon and the reds represent Flipkart. This simply means that if you are planning to expand your business globally then it would be advised that you start with amazon because when you will shift your focus to other countries you will have to shift to Amazon. Having prior experience on amazon will make sure that you don’t have to learn all of the systems all over again.
Now that’s out of the way let’s go.
The first thing to do is to get yourself registered on the platform. This to make sure that the whole experience for all of the parties involved is as pleasant as it can be. The parties being the platform (Flipkart) seller (you) and the customer. You can click here and you will be taken to the seller dashboard page. Once you are in the seller dashboard you will be asked to fill in the details below.
The details which you have to fill in are
- Your Name.
- Your mobile Number on which you can receive (OTP).
- Your Mail ID.
After you have added all of the above information you will have to give PIN code. Make sure that this is the PIN code is of the location from which the delivery person of Flipkart will collect the products for the delivery. Once the PIN code is verified then you will have to fill in the detailed address alongside GSTIN and whether you are operating as a business or as an individual. If you are operating as a business then you might be a few more details about your company such as is your company has a sole proprietorship or partnership. This is just to keep in the back of the mind if you are going to sell products as a business. Click here to read about which is better to register a business or individual. If you don’t have GSTIN then you can still sell books on Flipkart it’s one of the advantages.
The last thing which you will have to give them is your bank details. Now, these bank details should be associated with your business. After all this, you will have access to the seller dashboard. You can add or delete any product listing from here this is also where you can edit any of your listings if you made any mistake.
Under the seller dashboard, you will have to add your business name and store description. Please be aware that the business name and store description will be shown to the public. All of this is part of the 1st step and in this step, we have successfully created our account on Flipkart. This leads us to the second step.
Once you have created your account you will have to list your product on Flipkart, so that people can find your product and buy them. As I have previously mentioned above all of your management will be done from the seller dashboard. To log in into your seller dashboard you will need your mail ID and password which you have set in the previous step. You can click here to go to the login page of the seller dashboard.
Now that we are inside the seller dashboard you can add your listing. Adding listing is quite straightforward. On the top left-hand side of the top bar, you can find listing just beside the welcome button.

Once you have clicked the button you will be taken to the interface of the listings. Once you are in the listing interface you will see the button on the top right saying “ADD NEW LISTINGS”

When you will click on the above-mentioned button you will be presented with the option to either upload single listings or bulk listings. Whatever you select the system will present you with categories and sub-categories, you will have to select them according to the product. After you have selected the category and sub-category you will be asked to upload the images for the product.
Now keep in mind that the images should be of the same product which you are selling, otherwise people might send your product back or even file a complaint against you. Which could lead to some very big problems such as account suspension.
After you have uploaded the images Flipkart will take some time to do QC from their end and if everything is up to the standards then they will list your product and you can see your listing under my listing tab.
We have other articles on how to sell amazon Click here to read it.
Click here to read about 7 things that will help you expand your business globally.